

How to Configure Barracuda NG Firewalls and Barracuda Web Security Gateway Logging and Reporting
Before You Begin – See Fastvue Reporter for Barracuda
We have another product dedicated to making reporting on Barracuda NG Firewalls and Barracuda Web Security Gateway simple and easy. Fastvue Reporter for Barracuda includes live dashboards, alerts, and historical reporting, all preconfigured to show everything you need to know about employee Internet usage, bandwidth and how your network is operating.

Why WebSpy Vantage?
If you need full flexibility over the content of your reports, WebSpy Vantage provides a comprehensive report templating and data aliasing engine that is not available in Fastvue Reporter for Barracuda. If that is something you need, then please see the guide below on configuring Barracuda NG Firewalls and Barracuda Web Security Gateway logging and reporting with WebSpy Vantage.

1. Install a Syslog Server
WebSpy Vantage is not a syslog server and does not directly consume syslog messages for you. You therefore need to install a Syslog Server that collects the syslog messages and writes them to text files. WebSpy Vantage can then imports the text logs created by your syslog server.
There are many syslog servers available, including Fastvue Syslog (our own free, unlimited syslog server for Windows).
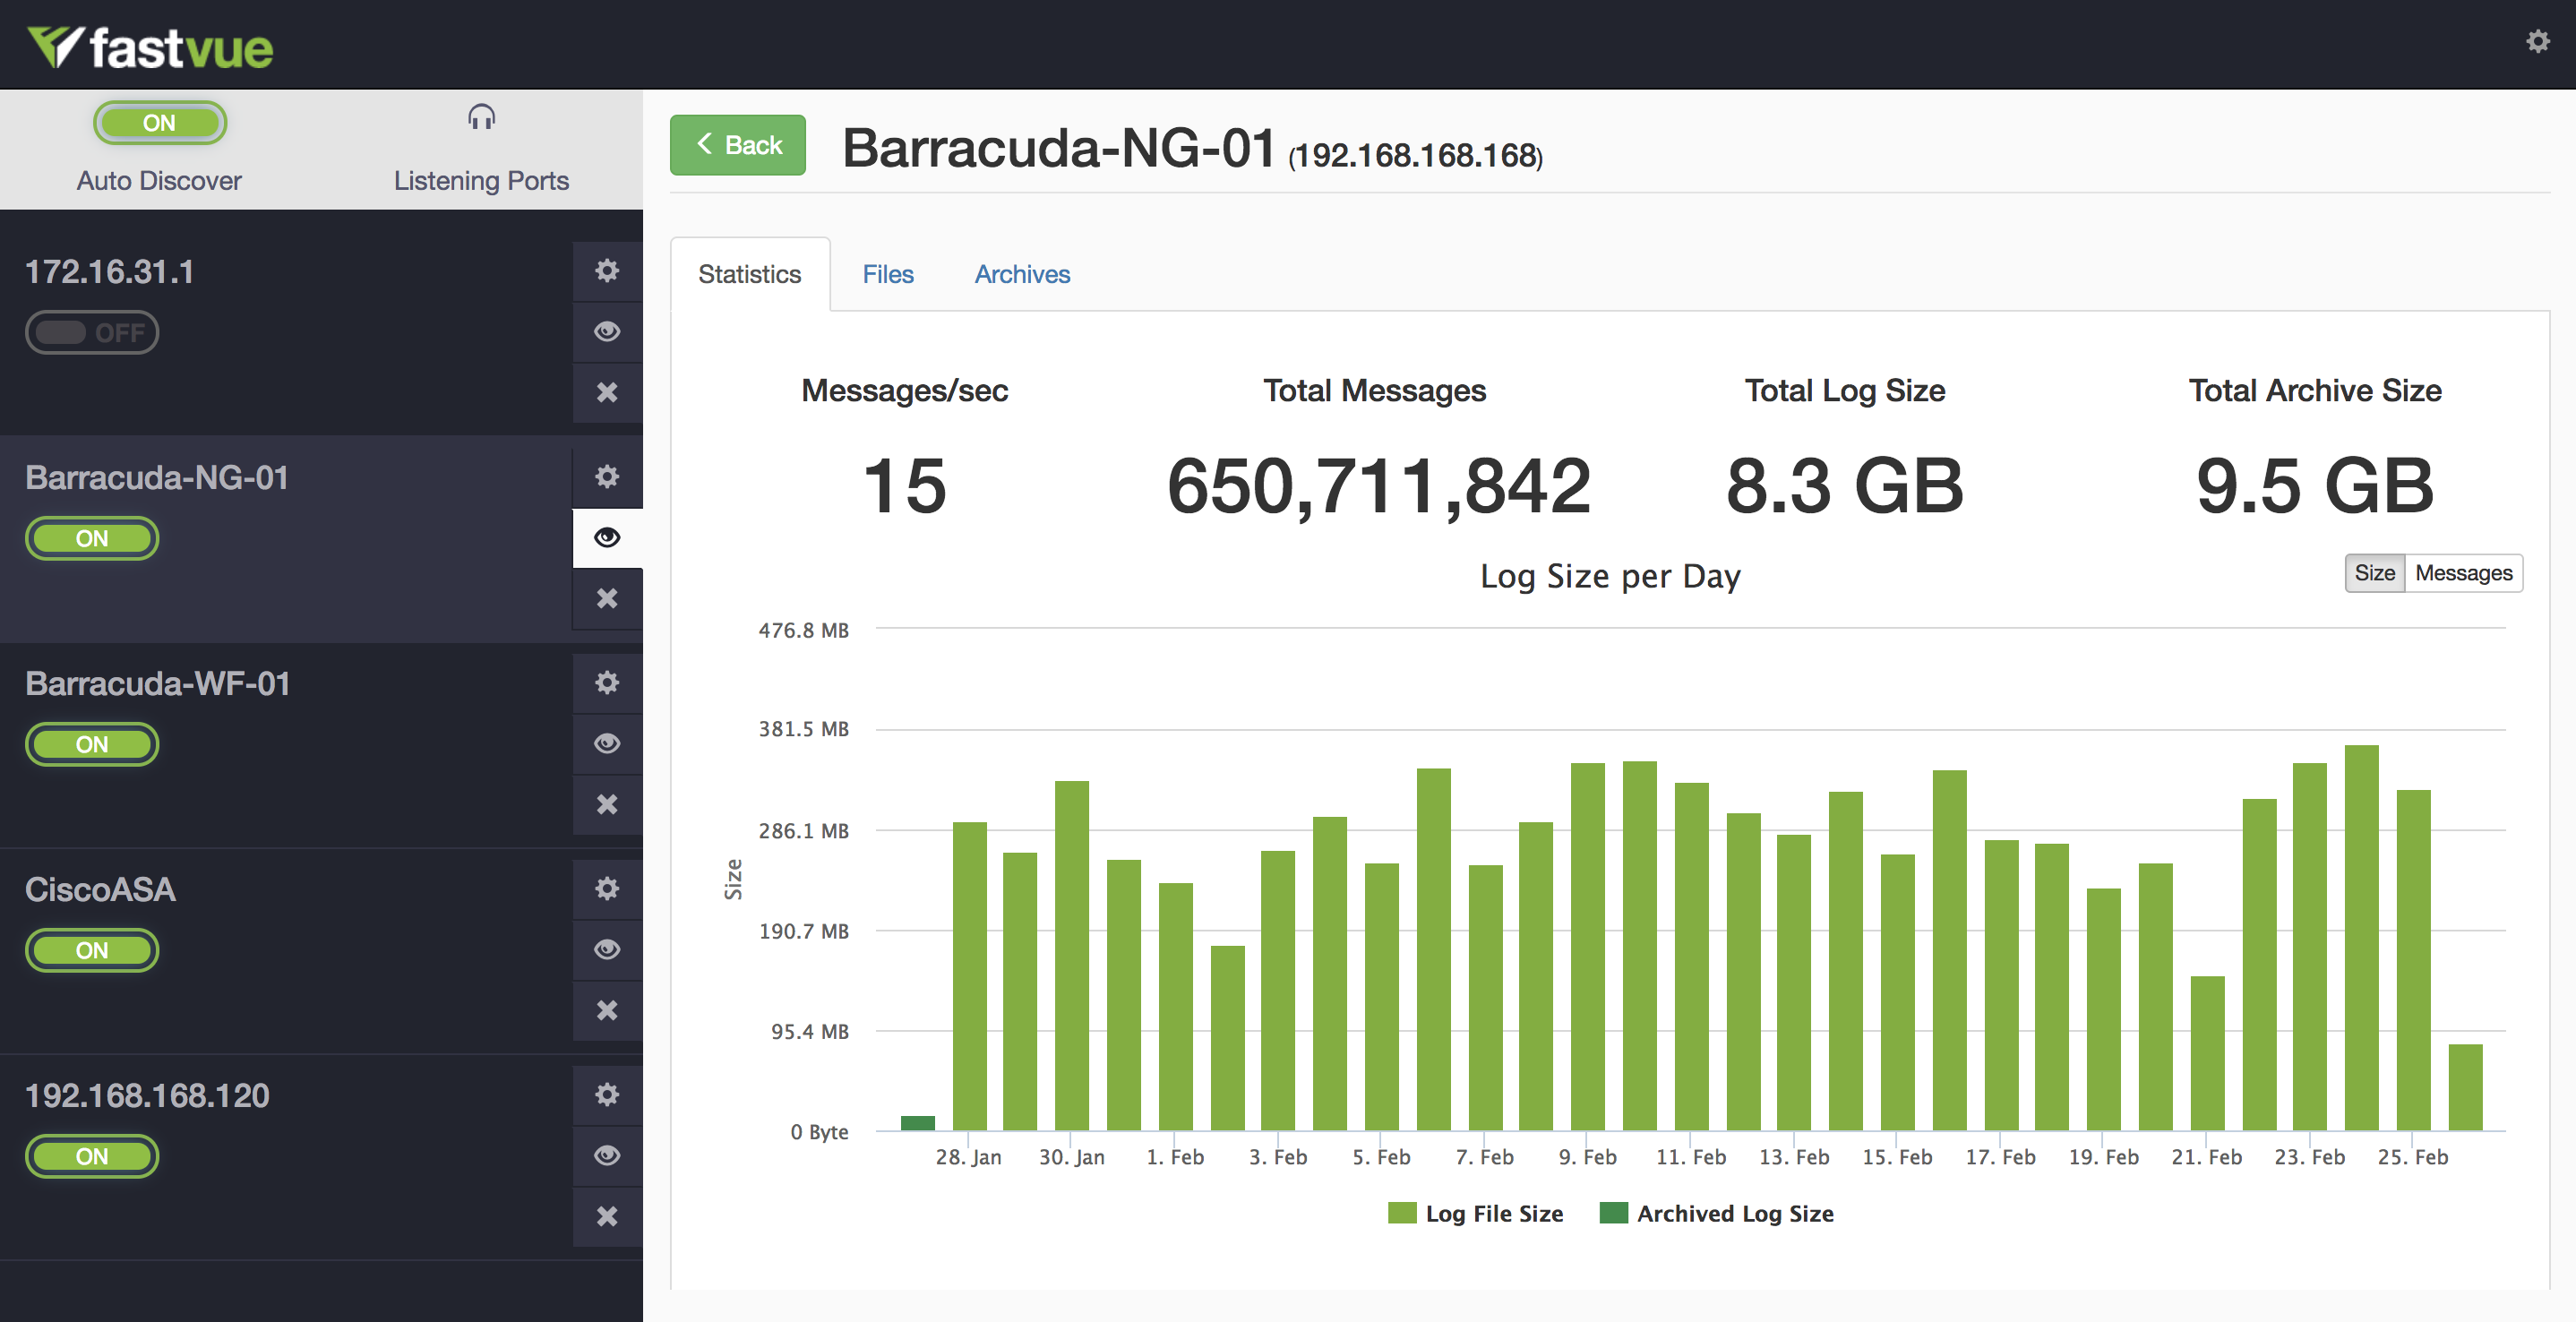
Barracuda NG Firewalls and Barracuda Web Security Gateway Syslog Server Configuration
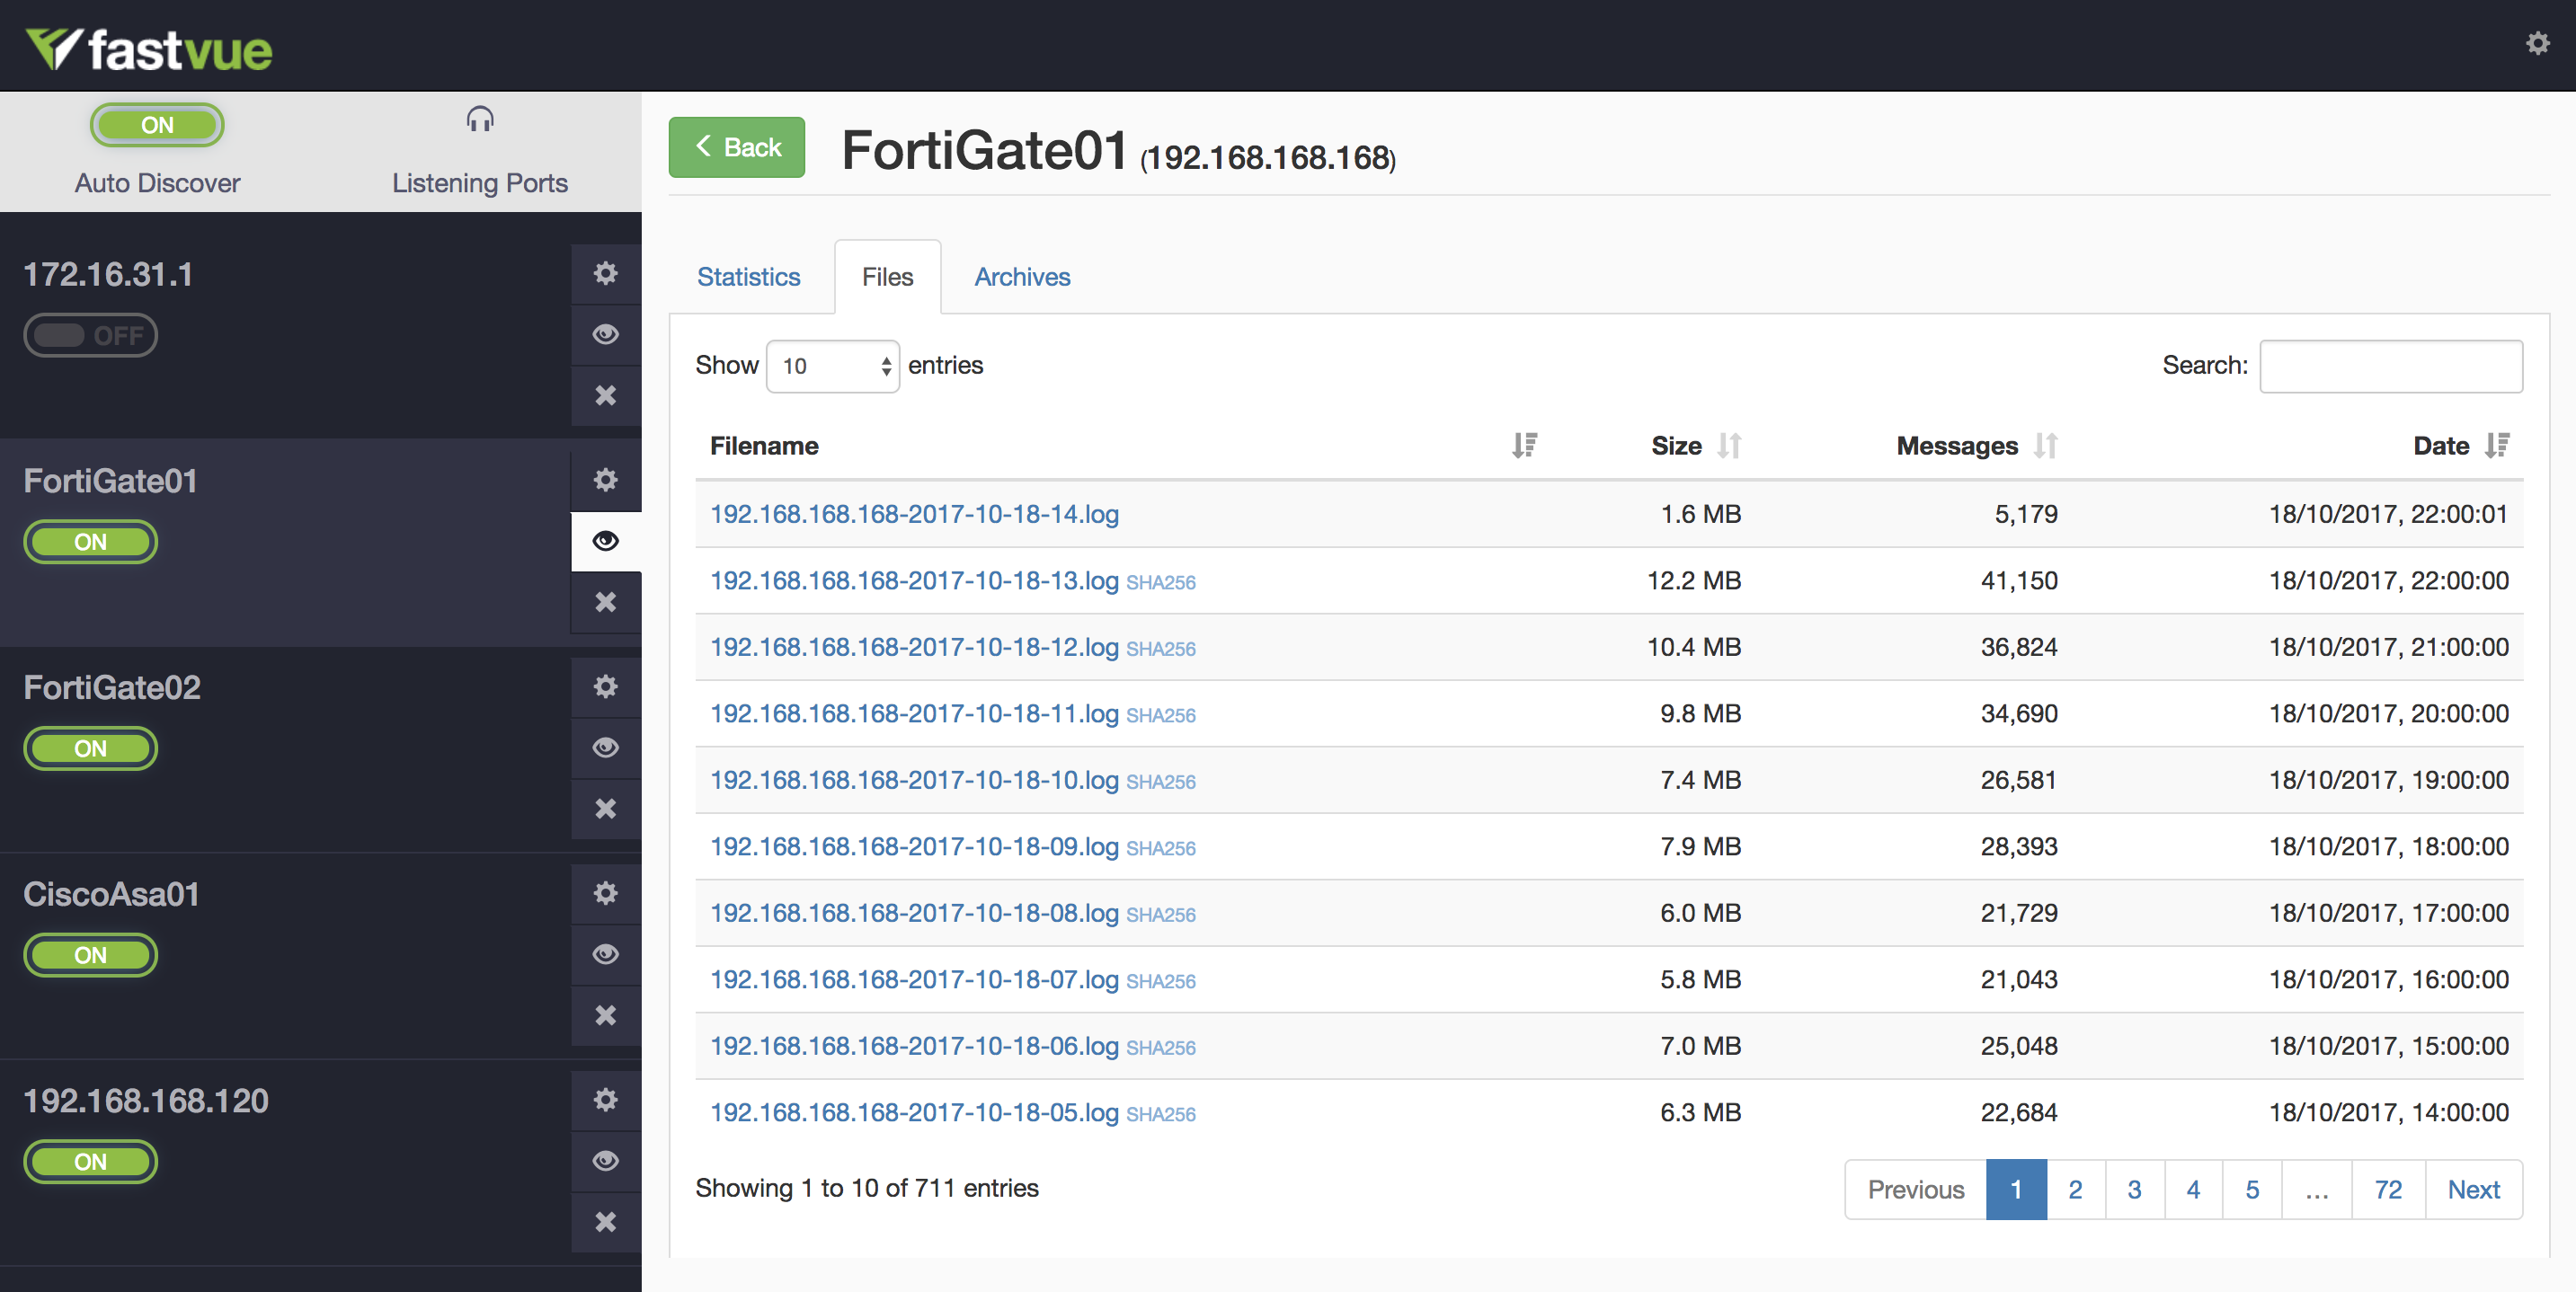
Barracuda Text Files created in Fastvue Syslog
2. Configure Syslog on Barracuda NG Firewalls and Barracuda Web Security Gateway
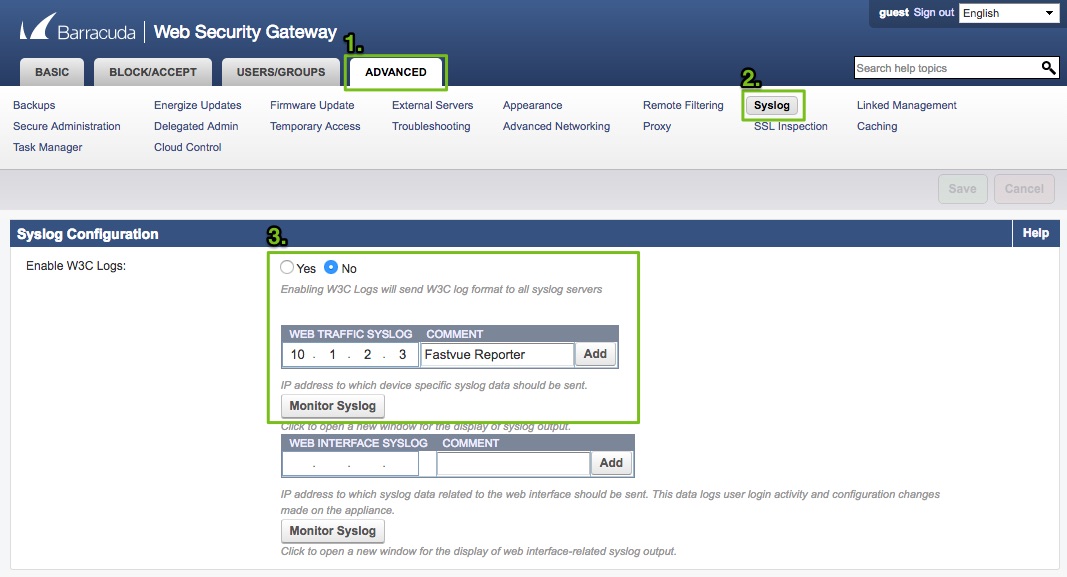
Barracuda Web Security Gateway (previously Barracuda Web Filter)
Configure Barracuda Web Security Gateway to send Web Filtering Syslog messages to your syslog server. This is done in Advanced | Syslog | Web Traffic Syslog. . Ensure the Enable W3C Logs option is set to No (Firmware Version 11.0 above).
Barracuda NG Firewall
Configure Barracuda NG Firewall to send Web Log Streaming Messages to your syslog server. To do this:
- Go to Configuration > Configuration Tree > Box > Infrastructure Services > Syslog Streaming. Click Lock.
- In the left menu, click Web Log Streaming.
- From the Enable Web Log Streaming list, select yes.
- Use the default Streaming Template. If you have already customized this, it should be:
NextGen_Firewall[]: %timestamp% 1 %srcip% %dstip% %content-type% %srcip% %uri% %content-length% BYF ALLOWED CLEAN 2 1 0 %actionnum% 0 (-) %actionnum% %urlcat% 0 - 0 %host% %urlcat% [%user%] %host% - - 0 - Select UDP as the Streaming Protocol.
- Enter the syslog server IP address as the Destination IP Address.
- Enter 514 as the Destination Port, unless you are using another syslog application on your syslog server that is already listing on port 514. In this case, specify a different port such as 50514.
- Click Send Changes and Activate.
Note: In order for HTTPS traffic to be exported via the web log streaming feature in Barracuda NGFW, you need to have virus scanning enabled for HTTPS traffic.
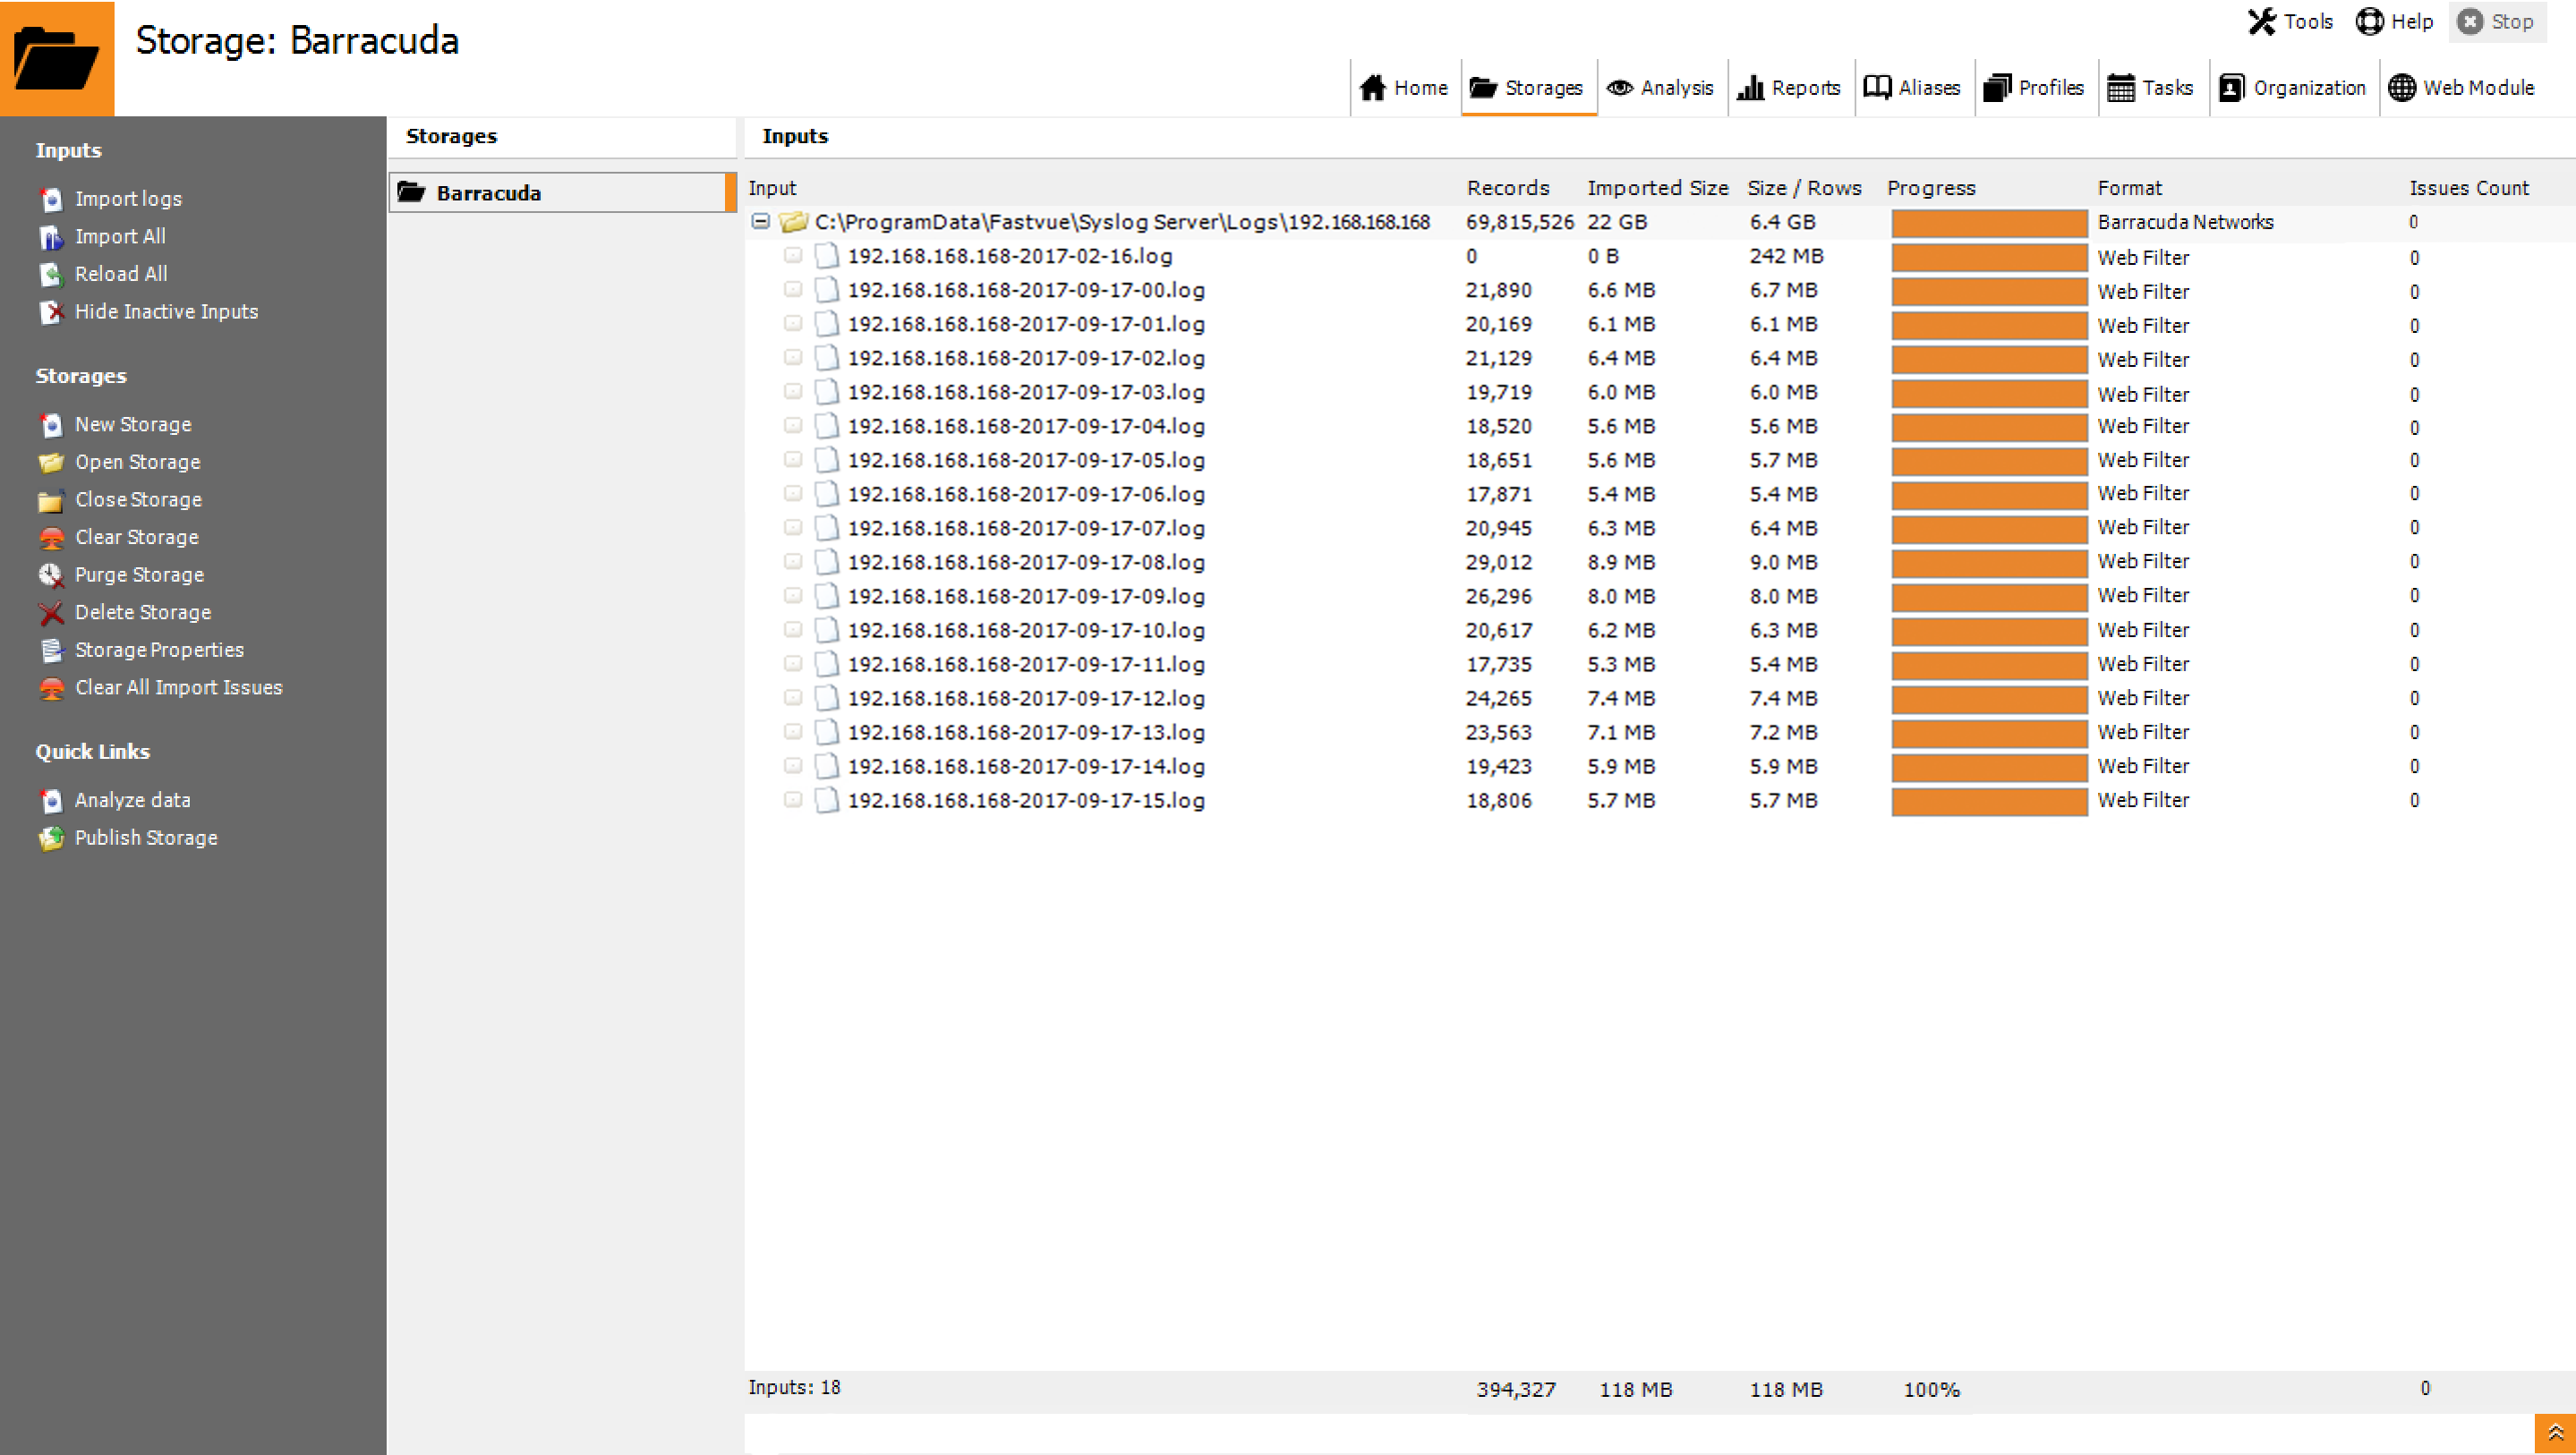
Importing Barracuda Syslog text files into WebSpy Vantage
Automating the process of importing and reporting on Barracuda NG Firewalls and Barracuda Web Security Gateway log files as a Daily Task
3. Import Your Syslog Text Files into WebSpy Vantage
To import your Barracuda NG Firewalls and Barracuda Web Security Gateway Log files into WebSpy Vantage:
- Open WebSpy Vantage and go to the Storages tab
- Click Import Logs to open the Import Wizard
- Create a new storage and call it Barracuda, or anything else meaningful to you. Click Next.
- Select Local or Networked Files or Folders and click Next.
- Select the Barracuda loader and click Next.
- Click Add | Folder and select the folder where your Barracuda NG Firewalls and Barracuda Web Security Gateway log files are stored. If you’re using Fastvue Syslog with default settings, your logs will be stored in C:\ProgramData\Fastvue\Syslog Server\Logs\
- Ignore the last three pages of the Import Wizard and click OK to begin the import process.
Your log files will start importing into your WebSpy Vantage Storage, and you can use this storage for Analysis and Reporting from this point on. You can even delete the original log file data once it has been imported.
Now that you have created a storage that is pointing to your Barracuda log data, it is a good idea to automate the process of importing new logs each night.
To do this:
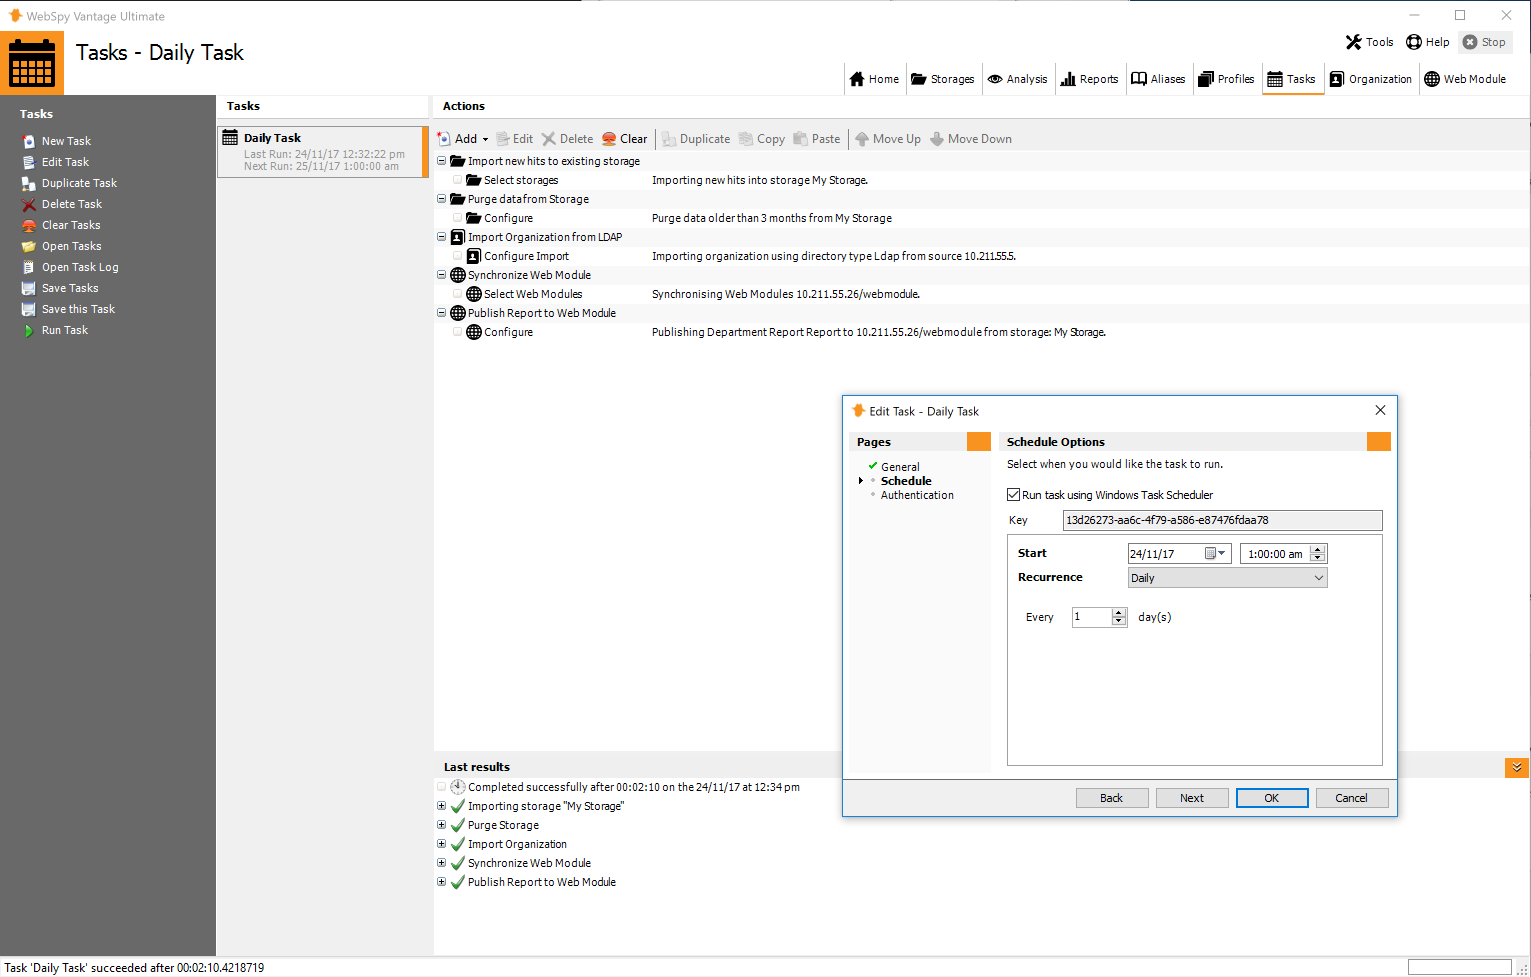
- In WebSpy Vantage, go to the Tasks tab and click New Task.
- Call the Task Daily Task and proceed through the short wizard to create a task with a Daily schedule running at 1 am in the morning.
- Once the Task has been added, select the next task and click Add Action | Import new hits to existing storage.
- Select the Storage you created above and ensure Resume import from last position is selected. Click OK to add the action.
WebSpy Vantage will now automatically import logs new log files each night at 1 am.
As this storage will grow until you run out of disk space, it is a good idea to add a data retention policy using the Purge data from storage task action.
To do this:
- Still on the Tasks tab, select the Task you created above and click Add Action | Purge Data from Storage
- Select your Barracuda storage and click Next
- Select your desired data retention, such as Purge data older than 3 months. Remember that the WebSpy Vantage storage will consume about 80% of the size of your Barracuda NG Firewalls and Barracuda Web Security Gateway logs.
- Click OK to add the action.
WebSpy Vantage will now automatically purge data from your storage once it has imported new logs files.
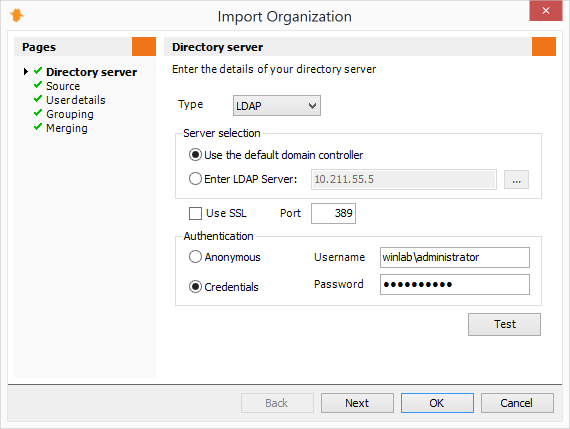
Entering Directory Server details
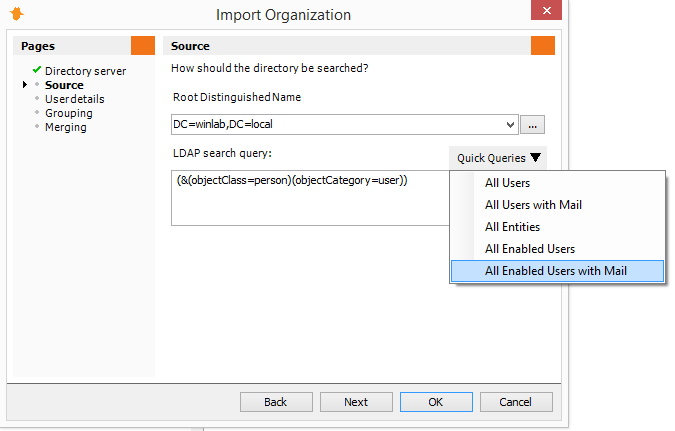
Selecting LDAP Root DN and Search Query.
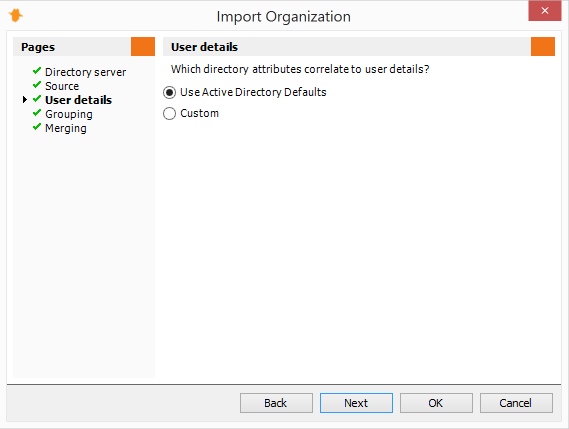
Using LDAP attributes for username aliasing and Web Module login names.
Grouping users by LDAP attributes and/or OUs.
LDAP import merging options.
A successfully imported Organization tree.
4. Import Your Organization
Barracuda NG Firewalls and Barracuda Web Security Gateway record authenticated usernames in their log files. WebSpy Vantage can import information from Active Directory to alias these authenticated users into real names (first name last name), departments, offices and OUs.
To do this, go to the Organization tab and click Import Organization.
On the Directory Server page, select your directory type and server, along with a username (in domain\username format) and password to authenticate with your directory server, and click Test. Click Next after you have successfully connected to your directory server.
Select a Root Distinguished Name to search for users within (for example, ‘dc=mydomain, dc=com’) from the dropdown list. If your users are contained within a specific OU, select the ‘…‘ button to select the OU in your directory.
The LDAP search query defaults to a query that returns ‘user accounts’. It’s important to note that WebSpy Vantage’s licensing is based on ‘number of users’, so if necessary, use the Quick Queries drop-down to change the LDAP search query and import a more specific set of user accounts, such as enabled users with an email address. WebSpy Vantage will import all users up to the license limit, which is unlimited during your trial. Click Next.
The User Details page defines how Vantage maps user objects in your Directory to authenticated usernames in your log files, as well as configuring user login names for the Web Module, the email address to send report notifications to, and the attribute to use to find a user’s manager.
If you are using Active Directory, you choose Use Active Directory Defaults. WebSpy Vantage will attempt to detect the name of your domain, and prefix this to all account names so that your authenticated usernames logged by Barracuda NG Firewalls and Barracuda Web Security Gateway are correctly aliased to a user object in Active Directory.
If your domain prefix on user accounts is different to your computer network’s domain name, click Custom, then check the Prefix checkbox and enter the required domain prefix.
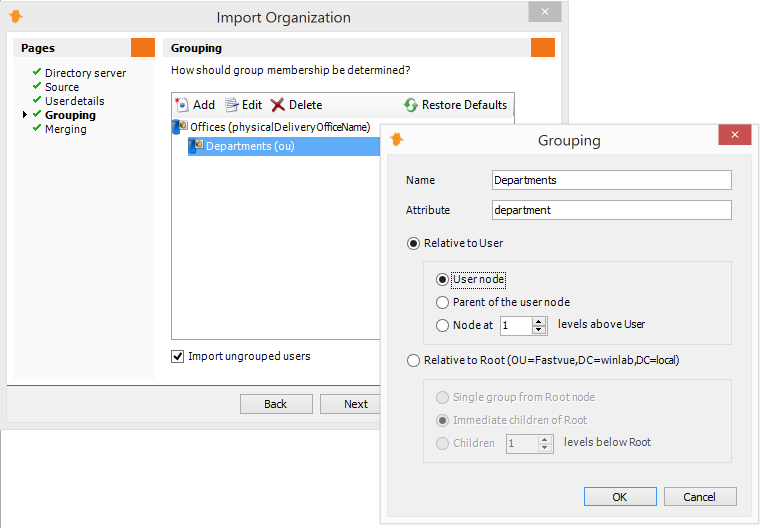
The Grouping page enables you to configure how you would like users grouped, such as by Departments, Offices, OUs etc. User Objects in Active Directory have a number of attributes, including department, office, description, company, and you can also place user objects in OU containers, and configure attributes on those containers. WebSpy Vantage can hook into any of these attributes to group your users for the purpose of reporting.
By default, there are two groups specified: Offices (using the ‘physicalDeliveryOfficeName’ attribute in Active Directory) and Departments (using the ‘department’ attribute in Active Directory).
If a user does not have one of these values populated in Active Directory, then they will be imported into the ‘Unknown’ department and office respectively. Alternatively, you can uncheck the Import Ungrouped Users option at the bottom of the Grouping page.
You can edit or delete these groups as necessary.
When adding or editing a group:
- First, enter the name of the Group into the Name field. This is up to you and should represent what the group is, such as ‘Departments’, ‘Locations’, ‘Business Centers’ etc. (Note, there are a few default Report Templates that use ‘Departments’ so use the word ‘Departments’ in one of your grouping levels utilize these reports).
- Enter the exact name of the attribute into the Attribute field. For example, enter ‘physicalDeliveryOfficeName’ to import the Office attribute from Active Directory. To import the name of an OU, use the attribute ‘OU’.
By default, Active Directory Users and Computers hides the real attribute names. You can change this by selecting View | Advanced Features to show the Attribute Editor with real attribute names when editing a User or OU.
- Relative to user:
Use this option if the attribute is located on the user object itself or on one of its parent OU containers. For example, if you are using the ‘Department’ attribute on the user objects, then select Relative to user and select User node. Or if your users are in a consistent OU structure, specify either Parent of the user node, or Node ‘n’ levels above to access the attribute on the appropriate parent OU container. - Relative to root:
Use this option to select OUs relative to the Root Distinguished Name that you specified on the Directory Server page. For example, if you have defined OUs for all your Offices directly underneath your Root DN, with user objects located anywhere underneath those OUs, then use the Immediate children of Root option, or the Children ‘n’ levels below Root option. For inconsistent OU structures, you can use the Single group from Root node option, and use the Import Organization wizard multiple times (usually configured with multiple task actions within a Task) with the Merge options set appropriately, to create groups from multiple Root DNs in your directory. - Click OK to add your Grouping level.
Tip: Later, you’ll need to configure Web Module access permissions for people and/or groups. To create a default set of permissions that apply to your entire organization, create a top-level group using an attribute that everyone is a member of. For example, call the group ‘Domain’ and use the attribute ‘dc’.
Once you have specified all the Groups you would like to use in your reporting process, click Next.
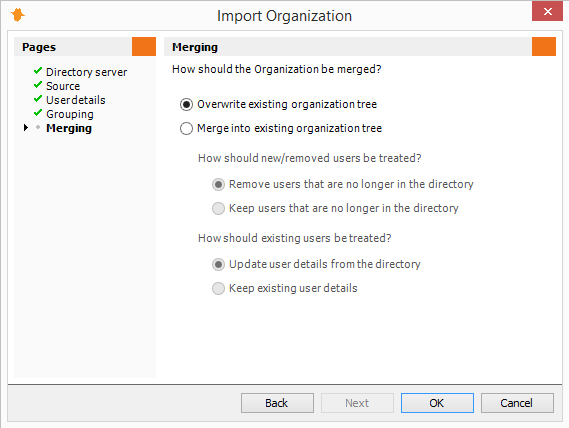
The Merging page enables you to use the Import Organization wizard multiple times, and merge the results into your existing Organization structure. For example, first import your Organization from one domain (or one Root DN on your domain), with the Overwrite existing organization tree option set to create an initial Organization tree, then run the Import Organization wizard again to import your Organization from another domain (or a different Root DN on your domain) and merge the results into your existing Organization tree.
The Merge options enable to you to keep or remove users that can no longer be found in the directory, as well as keep or update existing user’s details. Use the ‘keep users / keep details’ options if importing from a different domain or root DN.
Note: When merging, only users that have previously been added from your LDAP/LDIF directory will be affected. Users that have been manually added will not be affected.
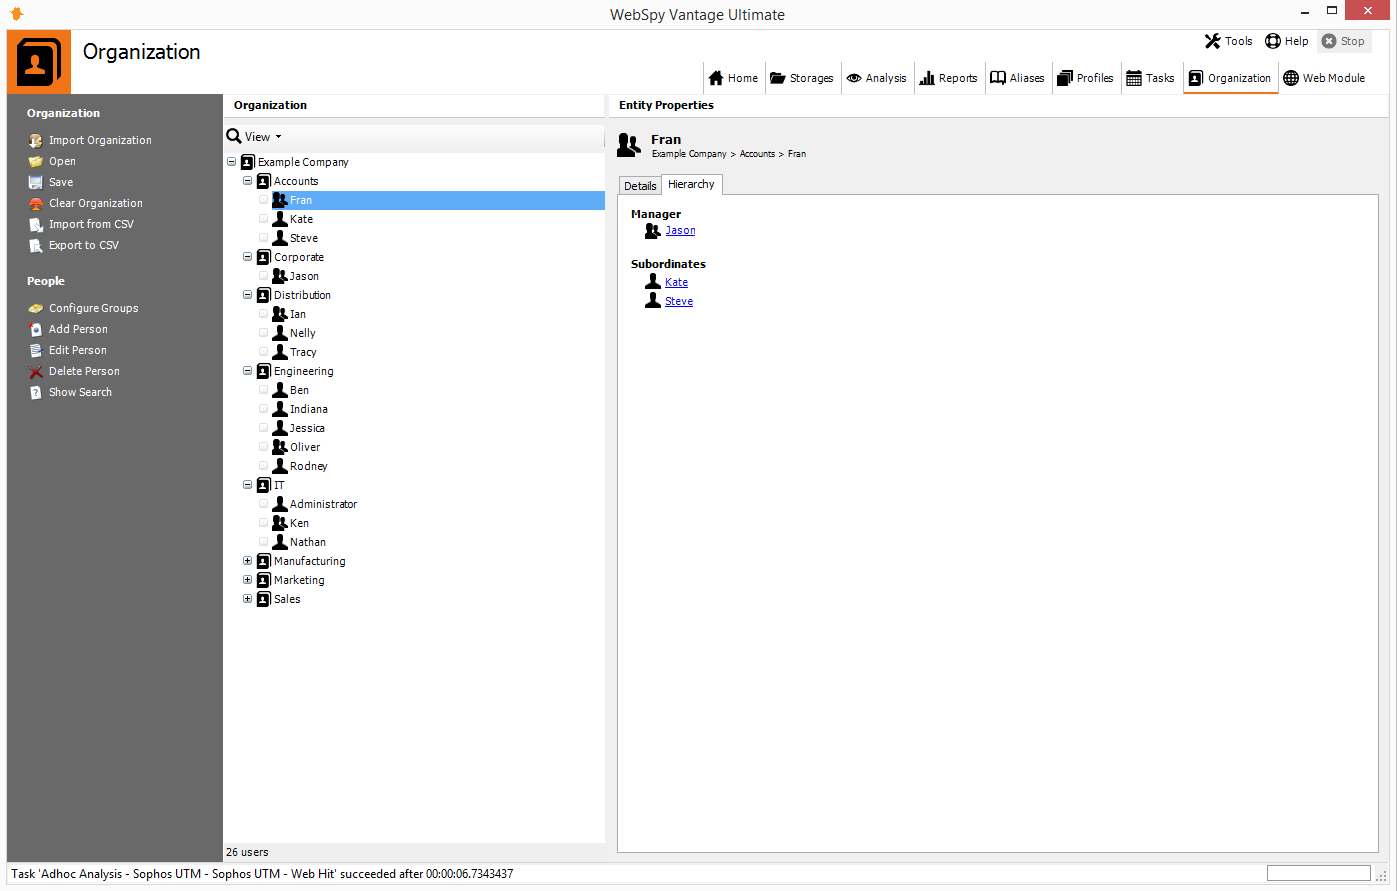
Click OK to complete the Import Organization wizard and begin the import. Once the import is complete you will see you the Organization tree displayed. You can use the View drop-down list at the top of the Organization tree to display your groups, or your manager/subordinate hierarchy.
You can automate the process of importing your Organization using the Tasks tab.
- Go to the Tasks tab and select a task, or create a new task, that runs on the desired schedule.
- Click Add | Import Organization from LDAP
- Follow the wizard to configure the options for importing your organization as above.
Synchronize with the Web Module
You also need to synchronize the Organization configuration with the web module every time it changes.
- Go to the Tasks tab and select the task that contains your Import Organization from LDAP task action.
- Click Add | Synchronize Web Module
- Select your Web Module and click OK.
- Use the up / down arrows to move the Synchronize Web Module action underneath the Import Organization from LDAP task action so that it happens after the organization import.
Every time you make changes to your Organization, you need to syncronize this information with the Web Module
Viewing Reports in the Web Module
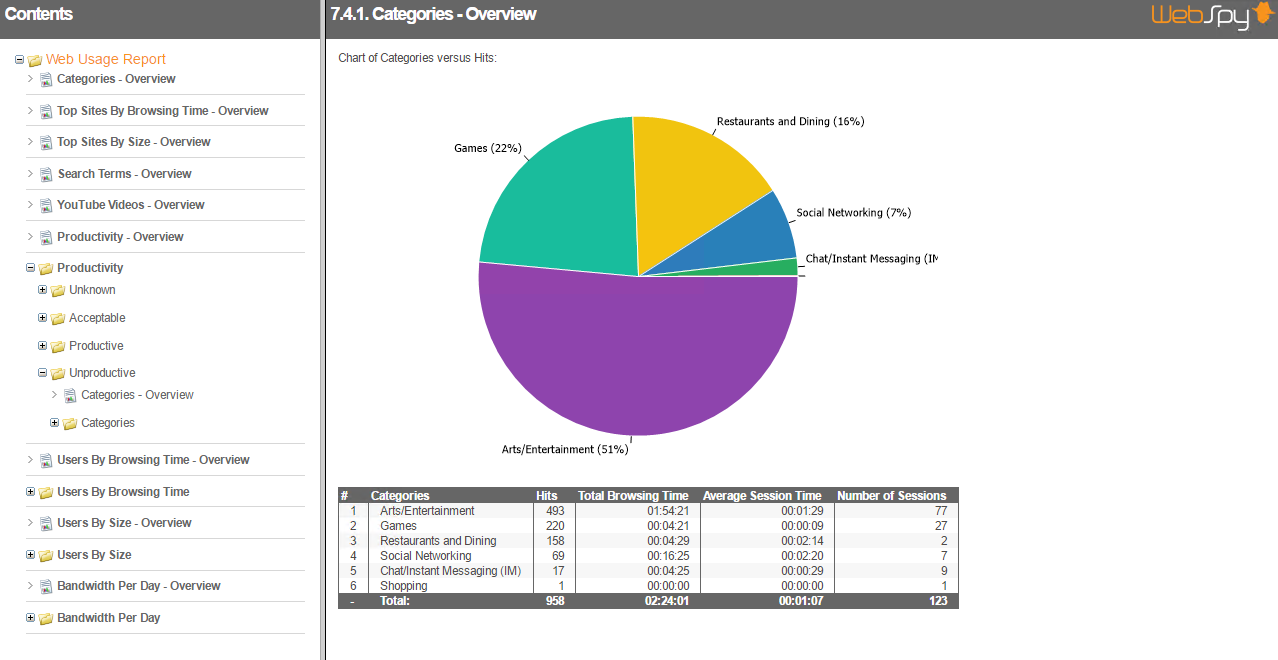
Viewing a Report Document (Web Document – HTML, Loose files format)
5. Run Reports
Now that you have automated the process of importing log files, it is time to do some Barracuda NG Firewalls and Barracuda Web Security Gateway reporting!
- Select one of the available Report Templates and click the Generate Report option to launch the Generate Report Wizard.
- On the Storages page, select the Storage you want to report on.
- On the Format page, select the type of document you want to create the report as (HTML, Word, PDF, CVS, Text).
- On the Publish page, you can customize the name of the report, prefix the name with today’s date, copy the report to a location and compress it using zip (useful when emailing the ‘HTML, Loose Files’ Report Format to someone as an attachment).
- On the Documents page, you can choose to split your report into multiple documents based on anything in your log files, and/or aliases you have created such as Categories, Departments, Subnets, and so on. Leave this option unchecked to create a single report document.
- On the Filters page, click Add | Date Filter and select the dates you want to report on. You can also include/exclude any values from your log files using Add | Field Value Filter.
- The Email page enables you to email the report to someone as an attachment (Set your SMTP options in Tools | Options | Email).
- Once the report has been generated, it will appear in the Report Manager at the bottom of the screen. Double-click the file to open and view the report.
- Select one of the available Report Templates and click the Publish Report option to launch the Publish Report to Web Module wizard.
- On the Storages page, select the Storage you want to report on.
- On the Template page, select the Report Template that you want to generate (the template selected in step 1 will be automatically selected)
- On the Publish page, select the Web Module you want to publish the report to. If you would like the option to drill down past the bounds of the report when viewing the report in the Web Module, check the Publish the selected storages to enable the ‘further analysis feature’ option.
- On the Split and Permit page, select No Separation to create just a single report, and select Everyone as the permission. Splitting reports by groups or managers and giving permission to certain people requires first importing your Organization information from LDAP on the Organization tab. See above.
- On the Filters page, click Add | Date Filter and select the dates you want to report on.
- The Notification page can be used to send a notification email to everyone with permission to the report(s). For now, leave the option unchecked.
- Click OK to publish the report to the Web Module.
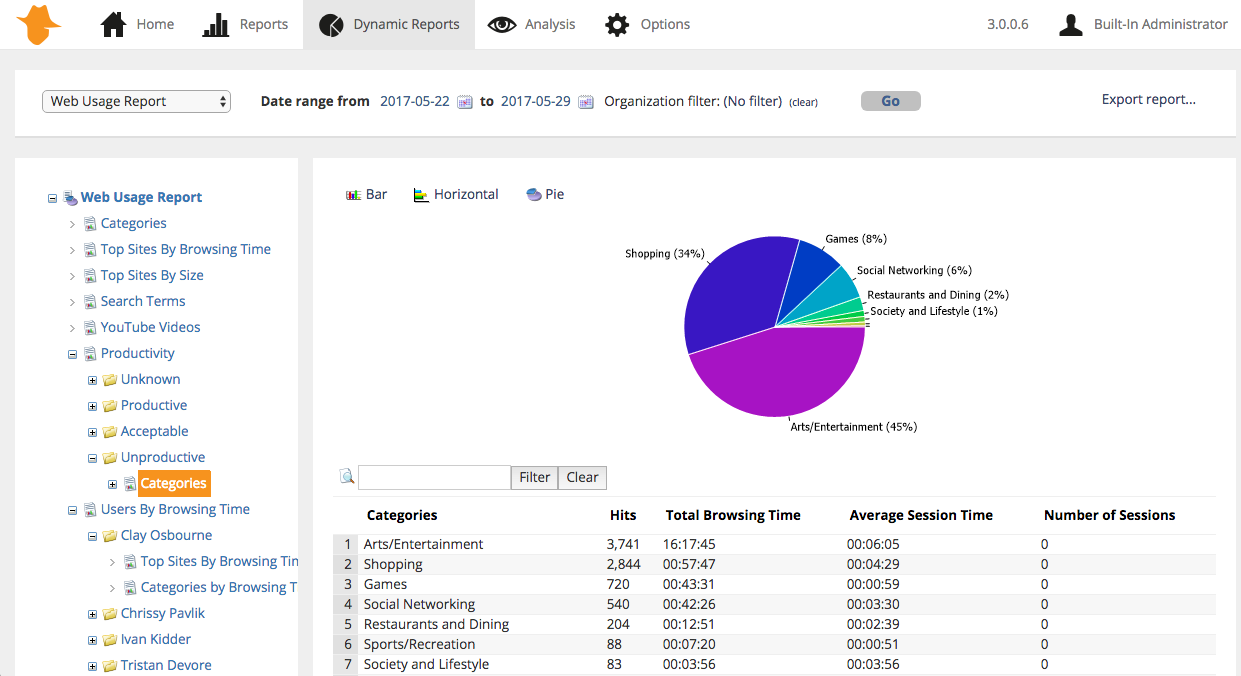
- Once the report has been published, log into the Web Module and go to the Reports tab. Click the report to open and view it.
You can automate the generation or publishing of Reports using the Tasks tab.
- Go to the Tasks tab and select a task, or create a new task, that runs on the desired schedule.
- Click the Add button to add a new Task Action.
- To generate reports as a document (Web, Word, PDF, CSV or Test), select the Run a Comparison or Analysis Report or Run a Trend Report action, depending on the type of report template you want to automate.
- To publish reports to the Web Module, select the Publish Report to Web Module action.
- Follow the wizard presented to configure the options for generating or publishing your report on the schedule. Make sure you add a Relative Date Filter on the Filters page to avoid reporting on your entire storage everytime the task runs.
- Use the up / down arrows to move the report action underneath other actions that need to occur first, such as importing log files, or importing your organization from LDAP (see above).
You may also like to see our article and video on Distributing web activity reports to managers using WebSpy Vantage.
Enjoy!
For further information on getting started and configuring WebSpy Vantage Ultimate, please see our Getting Started Guide, the Vantage Ultimate Documentation, or visit our Support Center.